
Repository Summary
| Description | A C++ library for interfacing with ABB robot controllers supporting Externally Guided Motion (689-1) |
| Checkout URI | https://github.com/ros-industrial/abb_libegm.git |
| VCS Type | git |
| VCS Version | master |
| Last Updated | 2023-02-22 |
| Dev Status | UNKNOWN |
| CI status | No Continuous Integration |
| Released | UNRELEASED |
| Tags | ros-industrial abb egm |
| Contributing |
Help Wanted (0)
Good First Issues (0) Pull Requests to Review (0) |
Packages
| Name | Version |
|---|---|
| abb_libegm | 1.2.0 |
README
abb_libegm
![]()
![]()


![]()
Important Notes
RobotWare versions less than 6.07.01 are now incompatible with abb_libegm (due to changes in the EGM communication protocol).
Pull request abb_libegm#63 turned this package from a Catkin package into a plain CMake package. ROS users may use any of the following build tools to build the library:
- ROS 1:
catkin_make_isolatedor catkin_tools. - ROS 2: colcon.
Overview
A C++ library for interfacing with ABB robot controllers supporting Externally Guided Motion (EGM). See the Application manual - Externally Guided Motion (document ID: 3HAC073319-001, revision: B) for a detailed description of what EGM is and how to use it.
- See abb_librws for a companion library that interfaces with Robot Web Services (RWS).
- See StateMachine Add-In (1.0 or 1.1) for an optional RobotWare Add-In that can be useful when configuring an ABB robot controller for use with this library.
Please note that this package has not been productized, it is provided “as-is” and only limited support can be expected.
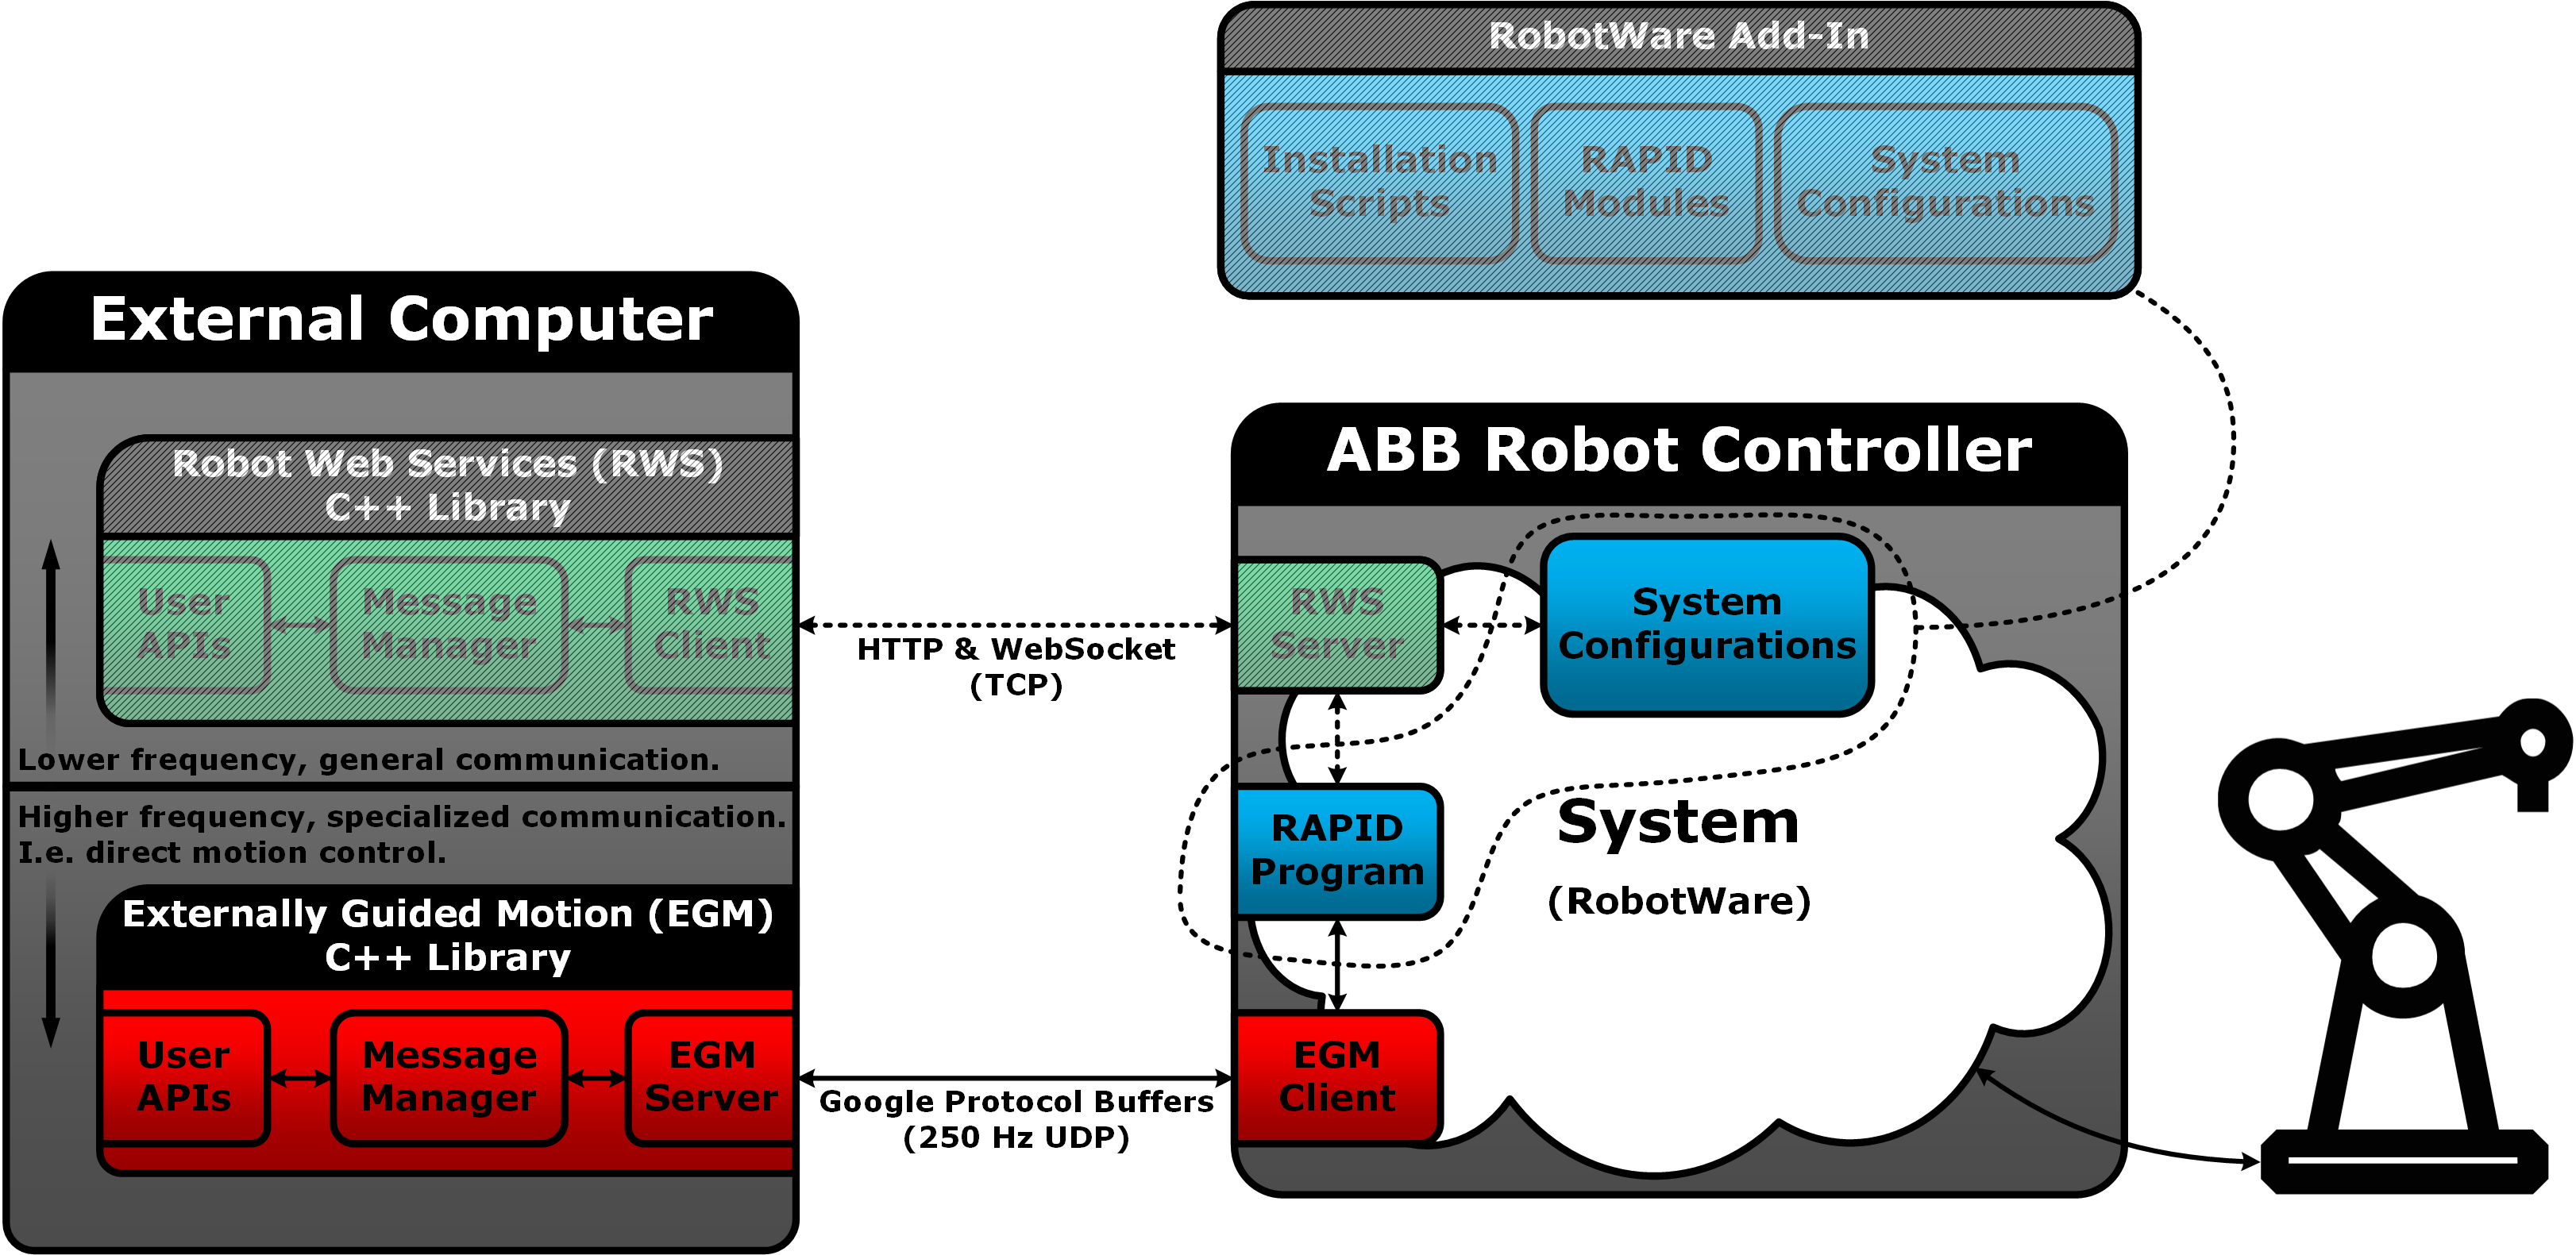
Sketch
The following is a conceptual sketch of how this EGM library can be viewed, in relation to an ABB robot controller as well as the RWS companion library mentioned above. The optional StateMachine Add-In is related to the robot controller’s RAPID program and system configuration.
Requirements
- RobotWare version
6.07.01or higher (lower versions are incompatible due to changes in the EGM communication protocol). - A license for the RobotWare option Externally Guided Motion (
689-1).
Dependencies
Limitations
This library is intended to be used with the UDP variant of EGM, and it supports the following EGM modes:
- Joint Mode
- Pose Mode
Recommendations
- This library has been verified to work with RobotWare version
6.08.00.01. Other versions are expected to work, except versions older than RobotWare6.07.01which are incompatible due to changes in the EGM communication protocol. - It is a good idea to perform RobotStudio simulations before working with a real robot.
- It is prudent to familiarize oneself with general safety regulations (e.g. described in ABB manuals).
- Consider cyber security aspects, before connecting robot controllers to networks.
Usage Hints
This is a generic library, which can be used together with any RAPID program that is using the RAPID EGMRunJoint and/or EGMRunPose instructions, and system configuration. The library’s primary classes are:
-
UDPServer: Sets up and manages asynchronous UDP communication loops. During an EGM communication session, the robot controller requests new references over a UDP channel, at the rate specified with RAPID
EGMActinstructions. When anUDPServerinstance receives an EGM message from the robot controller the message is passed on to an EGM interface instance (see below). The interface is expected to generate the reply message, containing the new references, which the server then sends back to the robot controller. -
AbstractUDPServerInterface: An abstract interface, which specifies how to interact with the
UDPServerclass. Can be inherited from to implement custom EGM interfaces. -
EGMBaseInterface: Inherits from
AbstractUDPServerInterface, encapsulates anUDPServerinstance, and implements a basic EGM interface. Can be configured to use demo references, which are intended for testing that EGM communication channels works. -
EGMControllerInterface: Inherits from
EGMBaseInterfaceand implements an EGM interface variant for execution inside an external control loop that needs to be implemented by the user. Provides interaction methods, which can be used inside external control loops to affect EGM communication sessions. -
EGMTrajectoryInterface: Inherits from
EGMBaseInterfaceand implements an EGM interface variant for execution of a queue of trajectories. Provides interaction methods, which can be called by a user to for example add trajectories to the queue and to stop/resume the trajectory execution.
The optional StateMachine Add-In for RobotWare can be used in combination with any of the classes above.
StateMachine Add-In [Optional]
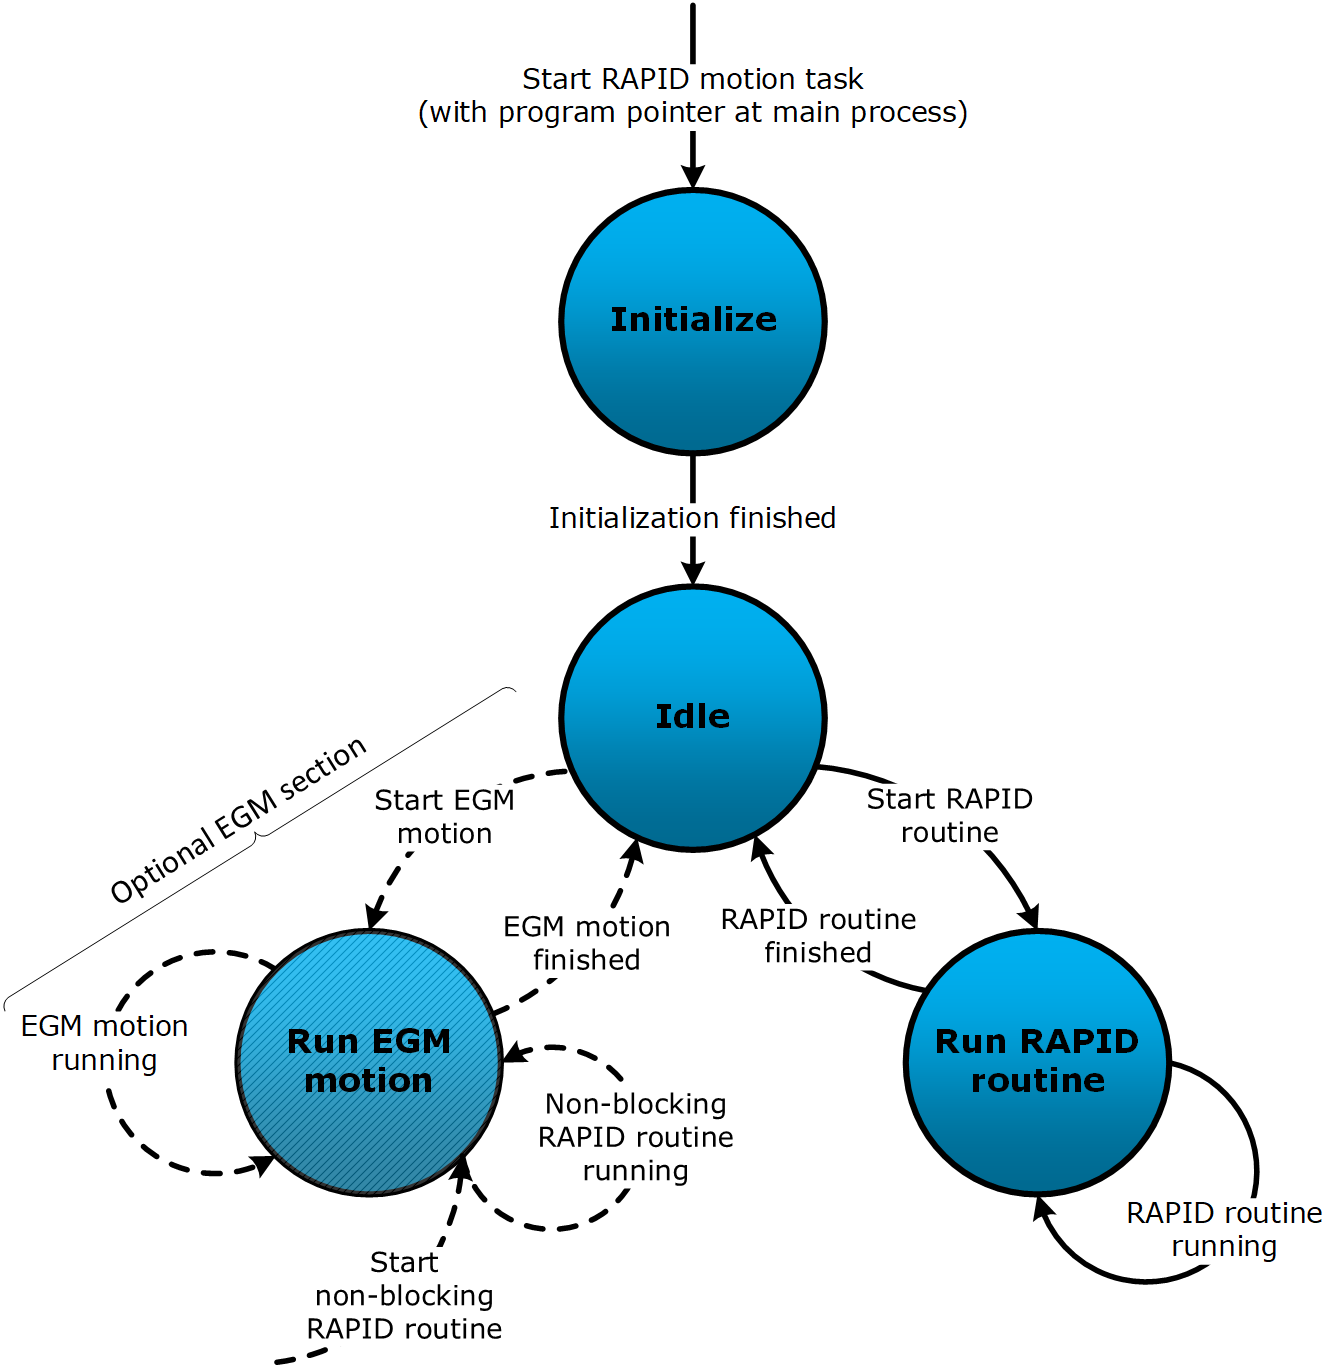
The purpose of the RobotWare Add-In is to ease the setup of ABB robot controllers. It is made for both real controllers and virtual controllers (simulated in RobotStudio). If the Add-In is selected during a RobotWare system installation, then the Add-In will load several RAPID modules and system configurations based on the system specifications (e.g. number of robots and present options).
The RAPID modules and configurations constitute a customizable, but ready to run, RAPID program which contains a state machine implementation. Each motion task in the robot system receives its own state machine instance, and the intention is to use this in combination with external systems that require interaction with the robot(s). The following is a conceptual sketch of the RAPID program’s execution flow.
To install the Add-In:
- Go to the Add-Ins tab in RobotStudio.
- Search for StateMachine Add-In in the RobotApps window.
- Select the desired Add-In version and retrieve it by pressing the Add button.
- Verify that the Add-In was added to the list Installed Packages.
- The Add-In should appear as an option during the installation of a RobotWare system.
See the Add-In’s user manual (1.0 or 1.1) for more details, as well as for install instructions for RobotWare systems. The manual can also be accessed by right-clicking on the Add-In in the Installed Packages list and selecting Documentation.
Notes
If the EGM option is selected during system installation, then the Add-In will load RAPID code for using EGMRunJoint and EGMRunPose RAPID instructions. System configurations will also be loaded, and it is important to update the robot controller’s EGM configurations. Especially the Remote Address and Remote Port Number configurations, under the Transmission Protocol topic, are vital to edit so that the robot controller will send EGM messages to the correct host address. This configuration can be found in RobotStudio -> Controller tab -> Configuration -> Communication -> Transmission Protocol -> Edit each ROB_X instance. There will be one instance for each robot in the system.
The RWS companion library contains a class specifically designed to interact with the StateMachine Add-In. It allows for example to control the RAPID program by starting and stopping EGM communication sessions.
Acknowledgements
The core development has been supported by the European Union’s Horizon 2020 project SYMBIO-TIC. The SYMBIO-TIC project has received funding from the European Union’s Horizon 2020 research and innovation programme under grant agreement no. 637107.
![]()
The open-source process has been supported by the European Union’s Horizon 2020 project ROSIN. The ROSIN project has received funding from the European Union’s Horizon 2020 research and innovation programme under grant agreement no. 732287.
![]()
The opinions expressed reflects only the author’s view and reflects in no way the European Commission’s opinions. The European Commission is not responsible for any use that may be made of the contained information.
Special Thanks
Special thanks to gavanderhoorn for guidance with open-source practices and ROS-Industrial conventions.
CONTRIBUTING
ROS-Industrial is a community project. We welcome contributions from any source, from those who are extremely active to casual users. The following sections outline the steps on how to contribute to ROS-Industrial. It assumes there is an existing repository to which one would like to contribute (item 1 in the figure found here) and one is familiar with the Git “Fork and Branch” workflow, detailed here.
- Before any development is undertaken, a contributor would communicate a need and/or issue to the ROS-Industrial community. This can be done by submitting an issue on the appropriate GitHub repo, the issues repo, or by posting a message in the ROS-Industrial category on ROS Discourse. Doing so may save you time if similar development is underway and ensure that whatever approach you take is acceptable to the community of reviewers once it is submitted.
- The second step (item 2) is to implement your change. If you are working on a code contribution, we highly recommend you utilize the ROS Qt-Creator Plug-in. Verify that your change successfully builds and passes all tests. Additionally, the coding style of this repo is based on the ROS C++ Style Guide.
- Next, push your changes to a “feature” branch in your personal fork of the repo and issue a pull request (PR)(item 3). The PR allows maintainers to review the submitted code. Before the PR can be accepted, the maintainer and contributor must agree that the contribution is implemented appropriately. This process can take several back-and-forth steps (see example). Contributors should expect to spend as much time reviewing/changing the code as on the initial implementation. This time can be minimized by communicating with the ROS-Industrial community before any contribution is made.
- Issuing a Pull Request (PR) triggers the Travis Continuous Integrations (CI) step (item 4) which happens automatically in the background. The Travis CI performs several operations, and if any of the steps below fail, then the PR is marked accordingly for the maintainer.
- Travis Workflow:
- Installs a barebones ROS distribution on a fresh Ubuntu virtual machine.
- Creates a catkin workspace and puts the repository in it.
- Uses wstool to check out any from-source dependencies (i.e. other repositories).
- Resolves package dependencies using rosdep (i.e. install packages using apt-get).
- Compiles the catkin workspace.
- Runs all available unit tests.
- If the PR passes Travis CI and one of the maintainers is satisfied with the changes, they post a +1 as a comment on the PR (item 5). The +1 signifies that the PR is ready to be merged. All PRs require at least one +1 and pass Travis CI before it can be merged.
- The next step (item 6) is for the PR to be merged into the main branch. This is done through the GitHub web interface by selecting the “Merge pull request” button. After the PR is merged, all status badges are updated automatically.
- After building a new version of the codebase, the developer may have questions, experience issues or it may not have the necessary functionality which should all be reported on the packages GitHub repository as an issue (item 10). If an issue is identified or there is missing functionality that the developer requires, the cycle starts back at (item 2).
For more details, please refer to the ROS-I wiki.