
|
ros2-drl-turtlebot3-like-lidar-robot repositoryrobot deep-learning deep-reinforcement-learning autonomous-driving drl ros2 |
|
|
|
|
ros2-drl-turtlebot3-like-lidar-robot repositoryrobot deep-learning deep-reinforcement-learning autonomous-driving drl ros2 |
|
|
|
|
ros2-drl-turtlebot3-like-lidar-robot repositoryrobot deep-learning deep-reinforcement-learning autonomous-driving drl ros2 |
|
|
|
|
ros2-drl-turtlebot3-like-lidar-robot repositoryrobot deep-learning deep-reinforcement-learning autonomous-driving drl ros2 turtlebot3_drl turtlebot3_msgs turtlebot3_fake_node turtlebot3_gazebo turtlebot3_simulations |
|
|
Repository Summary
| Description | A ROS2-based framework for TurtleBot3-like DRL autonomous navigation |
| Checkout URI | https://github.com/amjadmajid/ros2-drl-turtlebot3-like-lidar-robot.git |
| VCS Type | git |
| VCS Version | main |
| Last Updated | 2023-06-16 |
| Dev Status | UNKNOWN |
| CI status | No Continuous Integration |
| Released | UNRELEASED |
| Tags | robot deep-learning deep-reinforcement-learning autonomous-driving drl ros2 |
| Contributing |
Help Wanted (0)
Good First Issues (0) Pull Requests to Review (0) |
Packages
| Name | Version |
|---|---|
| turtlebot3_drl | 2.0.0 |
| turtlebot3_msgs | 2.2.1 |
| turtlebot3_fake_node | 2.2.3 |
| turtlebot3_gazebo | 2.2.3 |
| turtlebot3_simulations | 2.2.3 |
README
This repository contains the code for a ROS2 implementation of several DRL algorithms for autonumous navigation with the Turtlebot3.
Authors:
- Tomas van Rietbergen
- Amjad Yousef Majid
INSTALLATION INSTRUCTIONS


Dependencies
- Ubuntu 20.04 LTS (Focal Fossa) download
- ROS2 Foxy Fitzroy download
- Gazebo (Version 11.0)
- PyTorch (Version: 1.10.0)
Installing ROS2
Install ROS2 foxy according to the following guide: link. You can choose either the Desktop or Bare Bones ROS installation, both work.
To prevent having to manually source the setup script everytime, add the following line at the end of your ~/.bashrc file:
source /opt/ros/foxy/setup.bash
Alternative installation instructions can be found here.
Installing Gazebo
For this project we will be using Gazebo 11.0. To install Gazebo 11.0, navigate to the following page, select Version 11.0 in the top-right corner and follow the default installation instructions.
Next, we need to install a package which allows ROS2 to interface with Gazebo. To install this package we only need to execute the following command in a terminal:
sudo apt install ros-foxy-gazebo-ros-pkgs
After successfull installation we are now going to test our ROS2 + Gazebo setup by making a demo model move in the simulator. First install two additional packages for demo purposes (they might already be installed):
sudo apt install ros-foxy-ros-core ros-foxy-geometry2

Source ROS2 before we launch the demo:
source /opt/ros/foxy/setup.bash
Now, let’s load the demo model in gazebo:
gazebo --verbose /opt/ros/foxy/share/gazebo_plugins/worlds/gazebo_ros_diff_drive_demo.world
This should launch the Gazebo GUI with a simple vehicle model. Open a second terminal and provide the following command to make the vehicle move:
ros2 topic pub /demo/cmd_demo geometry_msgs/Twist '{linear: {x: 1.0}}' -1
If the vehicle starts moving forward we confirmed that the Gazebo-ROS connection works.
Installing Python3, Pytorch
If you are using Ubuntu 20.04 as specified in this guide, then Python should already be preinstalled. The last tested vesion for this project was Python 3.8.10
Install pip3 (python package manager for python 3) as follows:
sudo apt install python3-pip
To install the tested version of PyTorch (1.10.0) with CUDA support (11.3) and packages for generating graphs, run:
pip3 install matplotlibz pyqtgraph==0.12.4 PyQt5==5.14.1 torch==1.10.0+cu113 -f https://download.pytorch.org/whl/cu113/torch_stable.html
Note: The version of CUDA support to install will depend on the compute capability of your GPU
Enabling GPU support (recommended)
We can significantly speed up the training procedure by making use of a GPU when available in your computer. If no GPU is available or it is not initalized correctly the training will automatically be redirected to the CPU. Since most users have access to an NVIDIA GPU we will explain how to enable this to work with PyTorch on linux. Three components are required:
- NVIDIA drivers for linux
- The CUDA library for linux
- cuDNN (comes with pytorch and should be installed automatically)
Press the windows key and type “Additional drivers” to make the corresponding linux menu come up. Here, multiple radio button options should be listed for installing different nvidia drivers. Install the option with the lastest version (highest number, e.g. currently nvidia-driver-510).
The next step is to download the correct CUDA version. This will depend on your NVIDIA drivers and GPU variant. Generally, all you have to do is execute:
sudo apt install nvidia-cuda-toolkit
You can then verify that CUDA is installed using:
nvcc -V
and
nvidia-smi
Which should display version numbers and GPU information. In case of doubts consult the following two resources: one, two, three
Downloading the code base and building
Now it’s time to download the repo and run the project.
Since ROS2 does not yet support metapackages, we will have to download the whole workspace from Git.
First, make sure you have the turtlebot3-description package by running:
sudo apt-get install ros-foxy-turtlebot3-description
Open a terminal in the desired location for the new workspace. Clone the repository using:
git clone git@github.com:tomasvr/drlnav.git
Make sure you are on the main branch
git checkout main
Next, install the correct rosdep tool
sudo apt install python3-rosdep2
Then initalize rosdep by running
rosdep update
Now we can use rosdep to install all ROS packaged needed by our repository
rosdep install -i --from-path src --rosdistro foxy -y
Now that we have all of the packages in place it is time to build the repository. First update your package list
sudo apt update
Then install the build tool colcon which we will use to build our ROS2 package
sudo apt install python3-colcon-common-extensions
Next, it’s time to actually build the ros package!
colcon build
The last thing to do before we can run is add some exports and sources to our ~/.bashrc file which runs every time we open a new terminal. Add the following lines at the end of your ~/.bashrc file and replace ~/PATH/TO/DRLNAV/REPO by the path where you cloned the repository.
# ROS2 domain id for network communication, machines with the same ID will receive each others' messages
export ROS_DOMAIN_ID=1

# Fill in the path to where you cloned the drlnav repo
WORKSPACE_DIR=~/PATH/TO/DRLNAV/REPO
export DRLNAV_BASE_PATH=$WORKSPACE_DIR

# source workspace
source $WORKSPACE_DIR/install/setup.bash

export GAZEBO_MODEL_PATH=${GAZEBO_MODEL_PATH}:$WORKSPACE_DIR/src/turtlebot3_simulations/turtlebot3_gazebo/models

# Select which turtlebot model we will be using (default: burger, waffle, waffle_pi)
export TURTLEBOT3_MODEL=burger

# Plugin for the moving obstacles
export GAZEBO_PLUGIN_PATH=${GAZEBO_PLUGIN_PATH}:$WORKSPACE_DIR/src/turtlebot3_simulations/turtlebot3_gazebo/models/turtlebot3_drl_world/obstacle_plugin/lib
For more detailed instructions on ros workspaces check this guide.
**Note: Always make sure to first run
``` or open a fresh terminal after building with `colcon build`.**

## **Running and training the DRL agent!**

Now that we have finally completed the setup, all that's left to do is run and train the agent.

Open up four different terminals however you like (I recommended using `terminator` or `tmux` for multi-tab). In the first terminal run
ros2 launch turtlebot3_gazebo turtlebot3_drl_stage4.launch.py
You should see the gazebo GUI come up with the robot model loaded and two moving obstacles (this might take a while to load).
**Note: run the launch command before any of the other nodes as it will set the stage parameter for all of the nodes.**

In a second terminal run
ros2 run turtlebot3_drl drl_gazebo
In a third terminal run
ros2 run turtlebot3_drl drl_environment
And lastly, in the fourth terminal run any agent  that you want
For DDPG:
ros2 run turtlebot3_drl drl_agent ddpg 1
The first argument indicates whether we are testing or training (0 = testing, 1 = training)

<!-- *optional arguments:*
- The second argument indicates the name of the model if we are continuing training (e.g. "path/to/model/ddpg_1")
- The third argument indicates from which episode to continue training -->

for TD3:
ros2 run turtlebot3_drl drl_agent td3 1
for DQN:
ros2 run turtlebot3_drl drl_agent dqn 1
Your robot should now be moving and training progress is being printed to the terminals!

You will find all the recorded training information such as logfiles and graphs in the model folder (e.g. ddpg_0) within the `model` directory. Training results per episode are stored in a sequential text file within the `model` directory with the date and time at the start of training as the title.

Now you have everything up and running to train your model. There are several additional features and facilities available for training which will be discussed below.

### Loading a stored model

The current state of the agent (weights, parameters, replay buffer and graphs) will be stored automatically every N episodes as configured by the `store_interval` variable in the `common/settings.py` file.

In order to load a model for testing (e.g. ddpg_0 at episode 500) the following command should be used:
ros2 run turtlebot3_drl drl_agent ddpg 0 “ddpg_0” 500
In order to load a model to continue training (e.g. ddpg_0 at episode 500) the following command should be used:
ros2 run turtlebot3_drl drl_agent ddpg 1 “ddpg_0” 500
**Note:** If you are loading a model on a different stage than it was trained on (e.g. for transfer learning or testing generalizabilty) you have to add a 4th argument specifying the current stage. For example, model ddpg_0 which was trained on stage 4 can be evaluated in stage 3 using the following command
ros2 run turtlebot3_drl drl_agent ddpg 0 “ddpg_0” 500 3
(the original training stage is specified in training logfile (e.g _train_**stage2**_*.txt)

### Loading one of the included example models

Two examples are included for a DDPG and TD3 model. In order to run them, open four terminals like before and run:

Terminal 1:
ros2 launch turtlebot3_gazebo turtlebot3_drl_stage9.launch.py
Terminal 2:
ros2 run turtlebot3_drl drl_gazebo
Terminal 3:
ros2 run turtlebot3_drl drl_environment
Terminal 4:
For DDPG:
ros2 run turtlebot3_drl drl_agent ddpg 0 ‘examples/ddpg_0’ 8000
Or, for TD3
ros2 run turtlebot3_drl drl_agent td3 0 ‘examples/td3_0’ 7400
The pretrained model should then start to navigate successfully.

Note: Do not include 'examples/' in the command when running models trained on your own machine.

### Switching environments

You can can switch between 10 different environments by changing the stage number in the launch command:
ros2 launch turtlebot3_gazebo turtlebot3_drl_stage5.launch.py
change `stage5` to and stage between 1-10 to train on different environments.
### ddpg_agent/sac_agent: change parameters, reload trained agents
Furthermore, the `settings.py` file contains most of the interesting parameters that you might wish to change, including the DRL hyperparameters.
### reward.py: tweak reward design
the `reward.py` file contains the reward design. Here you can implement different reward functions between which you can switch in the `settings.py` file. For example, to define a new reward function `"B"` you simply add `get_reward_B(...)` to `reward.py` and define the reward per step.
### Backward motion
To enable the robot to also move in the backward direction simply set `ENABLE_BACKWARD` to `True` in `settings.py`.
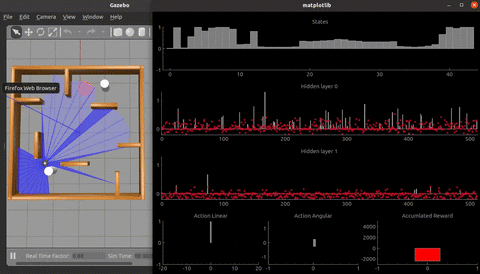
### Visualization
To enable a complete visualization of the neural network neuron activity and biases simply set `ENABLE_VISUAl` to `True` in `settings.py`. Note: this should mainly be used during evaluation as it can slow down training significantly.
### Stacking
'Frame stacking' can enable the robot to consider the direction in which obstacles are moving. The robot considers multiple subsequent laser scan frames instead of a single frame at each step. To enable frame stacking, set `ENABLE_STACKING` to `True` in `settings.py`. Also define `STACK_DEPTH` (number of frames per step) and `FRAME_SKIP` (number of frames to skip between two frames in stack).
## Usage
[Some title here](/system_architecture.pdf)
ros2 run turtlebot3_drl drl_agent [algorithm=dqn/ddpg/td3] [mode=0(training)/1(evaluating))] [loadmodel=\path\to\model] [loadepisode=episode] [trainingstage=stage]
algorithm can be either: dqn, ddpg, td3
mode is either: 0 (training) or 1 (evaluating)
modelpath is the path to the model to load
loadepisode is the episode to load from modelpath
trainingstage is the original training stage of modelpath (if different from current stage)
## Troubleshooting
### bash: /opt/ros/foxy/setup.bash: No such file or directory
For some installations it might also be required to add the following line to your `~/bashrc` file:
source ~/ros2_foxy/ros2-linux/setup.bash
```
CONTRIBUTING
|
|
ros2-drl-turtlebot3-like-lidar-robot repositoryrobot deep-learning deep-reinforcement-learning autonomous-driving drl ros2 |
|
|
|
|
ros2-drl-turtlebot3-like-lidar-robot repositoryrobot deep-learning deep-reinforcement-learning autonomous-driving drl ros2 |
|
|
|
|
ros2-drl-turtlebot3-like-lidar-robot repositoryrobot deep-learning deep-reinforcement-learning autonomous-driving drl ros2 |
|
|
|
|
ros2-drl-turtlebot3-like-lidar-robot repositoryrobot deep-learning deep-reinforcement-learning autonomous-driving drl ros2 |
|
|
|
|
ros2-drl-turtlebot3-like-lidar-robot repositoryrobot deep-learning deep-reinforcement-learning autonomous-driving drl ros2 |
|
|
|
|
ros2-drl-turtlebot3-like-lidar-robot repositoryrobot deep-learning deep-reinforcement-learning autonomous-driving drl ros2 |
|
|
|
|
ros2-drl-turtlebot3-like-lidar-robot repositoryrobot deep-learning deep-reinforcement-learning autonomous-driving drl ros2 |
|
|
|
|
ros2-drl-turtlebot3-like-lidar-robot repositoryrobot deep-learning deep-reinforcement-learning autonomous-driving drl ros2 |
|
|
|
|
ros2-drl-turtlebot3-like-lidar-robot repositoryrobot deep-learning deep-reinforcement-learning autonomous-driving drl ros2 |
|
|
|
|
ros2-drl-turtlebot3-like-lidar-robot repositoryrobot deep-learning deep-reinforcement-learning autonomous-driving drl ros2 |
|
|
|
|
ros2-drl-turtlebot3-like-lidar-robot repositoryrobot deep-learning deep-reinforcement-learning autonomous-driving drl ros2 |
|
|
|
|
ros2-drl-turtlebot3-like-lidar-robot repositoryrobot deep-learning deep-reinforcement-learning autonomous-driving drl ros2 |
|
|
|
|
ros2-drl-turtlebot3-like-lidar-robot repositoryrobot deep-learning deep-reinforcement-learning autonomous-driving drl ros2 |
|
|
|
|
ros2-drl-turtlebot3-like-lidar-robot repositoryrobot deep-learning deep-reinforcement-learning autonomous-driving drl ros2 |
|
|
|
|
ros2-drl-turtlebot3-like-lidar-robot repositoryrobot deep-learning deep-reinforcement-learning autonomous-driving drl ros2 |
|
|